Hey there, tech enthusiasts! If you're reading this, chances are you're diving headfirst into the world of IoT and cloud computing. And honestly, who can blame you? The Internet of Things (IoT) is no longer just a buzzword; it's a game-changer. But let me guess—right now, you're scratching your head wondering how to SSH into an IoT device anywhere using AWS. Sounds like a mouthful, right? Don’t worry, I’ve got your back.
Now, let’s cut to the chase. SSH IoT device anywhere AWS example isn’t just a phrase you throw around at tech meetups to sound smart. It’s actually a practical solution for managing remote devices securely and efficiently. Whether you're monitoring sensors in a smart city or controlling a fleet of drones, AWS offers tools that make this process seamless.
In this article, we’ll break it down step by step, covering everything from setting up your environment to troubleshooting common issues. By the end of this, you'll have a solid understanding of how to SSH into IoT devices using AWS, and you'll be ready to take on the world—or at least your next project!
Read also:Four Girl One Fingerprint Video The Craze Explained
Table of Contents
- Introduction to SSH
- IoT Overview
- Why Choose AWS?
- Setting Up AWS
- Configuring SSH
- Connecting to IoT Devices
- Security Best Practices
- Troubleshooting Common Issues
- Real-World Example
- Conclusion
Introduction to SSH
Alright, let’s start with the basics. SSH, or Secure Shell, is basically your golden ticket to remotely accessing devices. Think of it as a secure communication channel between your computer and any other device out there. It’s like sending a secret message that only the two of you can read.
SSH IoT device anywhere AWS example becomes especially useful when you’re dealing with remote systems. You don’t need to physically be near the device to manage it. Just whip out your laptop, connect via SSH, and boom—you’re in control.
Why SSH Matters
Let’s face it, security is a big deal. Especially when you’re dealing with IoT devices that are scattered all over the place. SSH encrypts your data, keeping it safe from prying eyes. So whether you’re managing a sensor in a remote location or controlling a smart thermostat, SSH has got your back.
IoT Overview
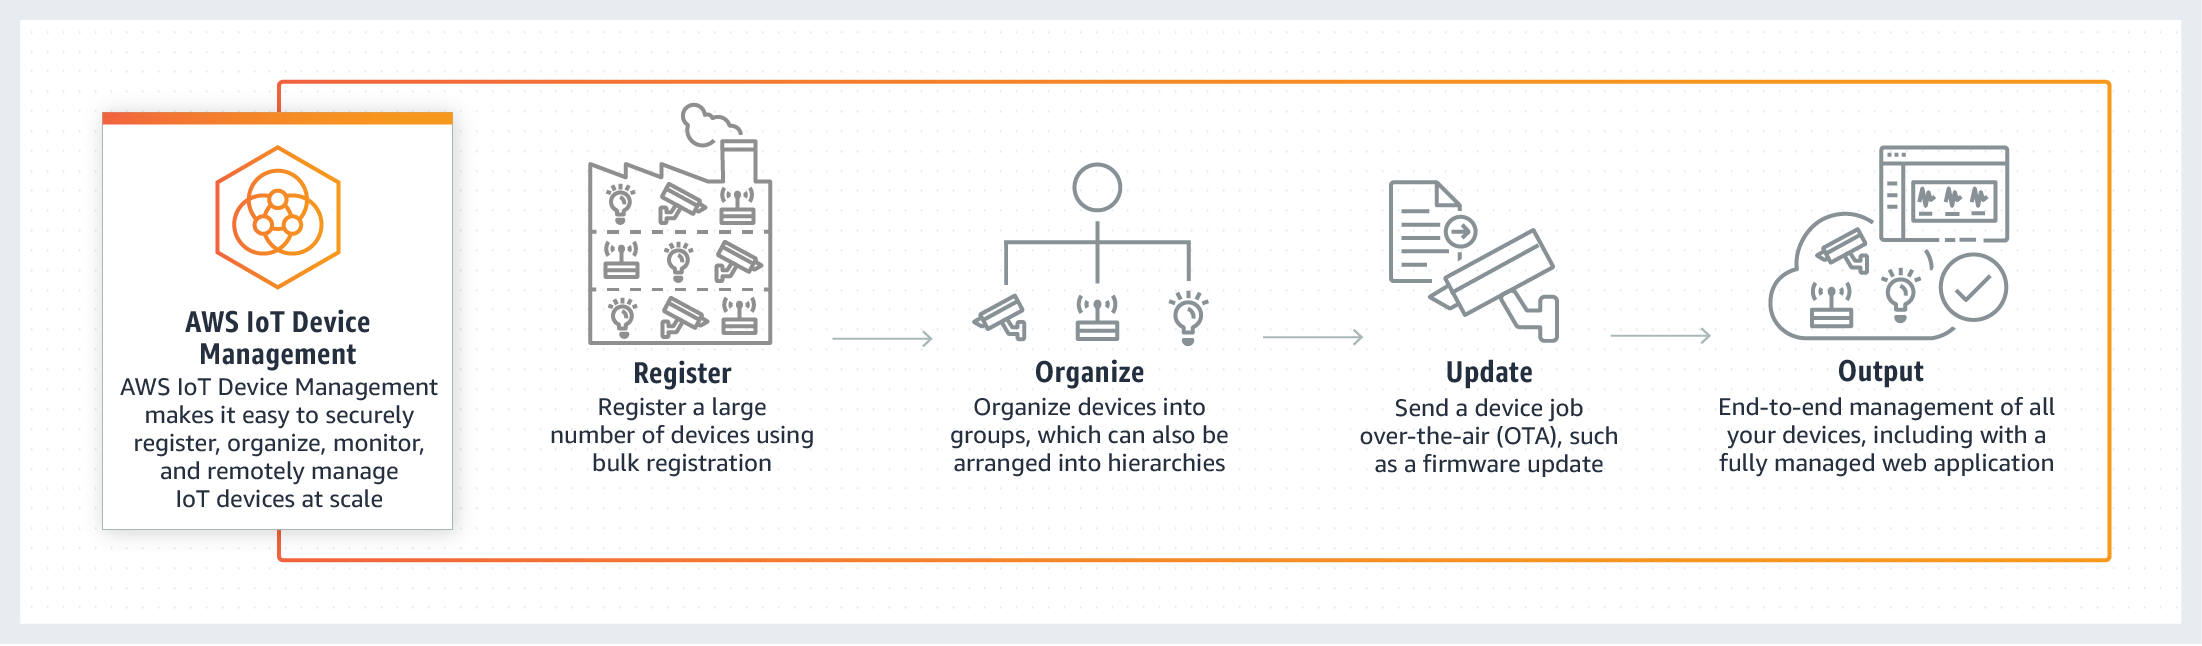
Now, let’s talk about IoT. The Internet of Things is basically a network of devices that can communicate with each other. Think smart fridges, connected cars, or even wearables. These devices generate tons of data, and managing them can be a challenge. That’s where AWS comes in.
With AWS, you can create a centralized hub for all your IoT devices. You can monitor their performance, collect data, and even push updates—all from one place. It’s like having a command center for your entire IoT ecosystem.
Benefits of IoT
- Improved efficiency
- Enhanced data collection
- Remote management capabilities
- Scalability
Why Choose AWS?
So, why AWS? Well, for starters, it’s one of the most reliable cloud platforms out there. AWS offers a wide range of services that cater specifically to IoT needs. From AWS IoT Core to AWS Lambda, you’ve got all the tools you need to build a robust IoT infrastructure.
Read also:Maydesi The Ultimate Guide To The Rising Tiktok Sensation
Plus, AWS has a massive global presence, meaning you can deploy your devices anywhere in the world and still have seamless connectivity. It’s like having a global network at your fingertips.
Key Features of AWS IoT
- Device management
- Secure communication
- Scalable infrastructure
- Integration with other AWS services
Setting Up AWS
Alright, let’s get our hands dirty. The first step in SSH IoT device anywhere AWS example is setting up your AWS environment. Start by creating an AWS account if you haven’t already. Once you’re in, navigate to the AWS Management Console and set up your IoT Core service.
Here’s a quick breakdown of what you need to do:
- Create an IAM user with the necessary permissions
- Set up an IoT policy
- Provision your device certificate
- Connect your device to AWS IoT Core
Tips for Setting Up AWS
Remember, AWS can be overwhelming at first, but taking it step by step makes it manageable. Don’t hesitate to refer to the AWS documentation if you get stuck. Trust me, it’s your best friend when it comes to troubleshooting.
Configuring SSH
Now that your AWS environment is ready, it’s time to configure SSH. This is where the magic happens. You’ll need to generate an SSH key pair and install the SSH client on your device. Once that’s done, you can establish a secure connection to your IoT device.
Here’s a quick guide:
- Generate an SSH key pair using a tool like PuTTYgen
- Install the SSH client on your IoT device
- Set up the SSH server on your device
- Connect to your device using the SSH client
SSH Configuration Tips
One thing to keep in mind is that SSH configuration can vary depending on your device and operating system. Always refer to the device’s documentation for specific instructions. And don’t forget to secure your SSH keys—you wouldn’t want someone else gaining access to your devices!
Connecting to IoT Devices
Finally, the moment you’ve been waiting for—connecting to your IoT device. With everything set up, all you need to do is open your terminal, enter the SSH command, and voila! You’re connected.
Here’s the command you’ll use:
ssh -i /path/to/your/key.pem username@device_ip
Common Connection Issues
Of course, things don’t always go smoothly. If you’re having trouble connecting, here are a few things to check:
- Make sure your SSH key is correct
- Verify the device’s IP address
- Check your firewall settings
- Ensure the SSH server is running on the device
Security Best Practices
Security should always be at the forefront of your mind when working with IoT devices. Here are a few best practices to keep in mind:
- Use strong, unique passwords
- Enable two-factor authentication
- Regularly update your devices
- Monitor your devices for suspicious activity
Remember, the more secure your devices are, the better protected your data is.
Troubleshooting Common Issues
Even the best-laid plans can go awry. If you’re encountering issues with SSH IoT device anywhere AWS example, here are a few troubleshooting tips:
- Check your AWS configuration settings
- Verify your SSH key permissions
- Test your connection using a different device
- Refer to AWS support forums for additional help
Don’t get discouraged if things don’t work the first time. Troubleshooting is all part of the process.
Real-World Example
Let’s put it all together with a real-world example. Imagine you’re managing a fleet of drones for aerial mapping. Each drone is equipped with sensors that collect data about the terrain. Using SSH IoT device anywhere AWS example, you can connect to each drone remotely, monitor its performance, and retrieve the data it collects.
This setup not only saves you time but also ensures that your data is secure and accessible from anywhere in the world.
Conclusion
And there you have it, folks! SSH IoT device anywhere AWS example isn’t as daunting as it seems. With the right tools and a bit of know-how, you can manage your IoT devices like a pro.
Remember, the key to success is staying informed and continuously learning. So don’t be afraid to experiment, try new things, and push the boundaries of what’s possible.
Now, it’s your turn. Got any questions or comments? Drop them below. And if you found this article helpful, don’t forget to share it with your fellow tech enthusiasts!